Home Assistant Custom Weather Page
Create a custom weather page for an Australian location in your Home Assistant dashboard

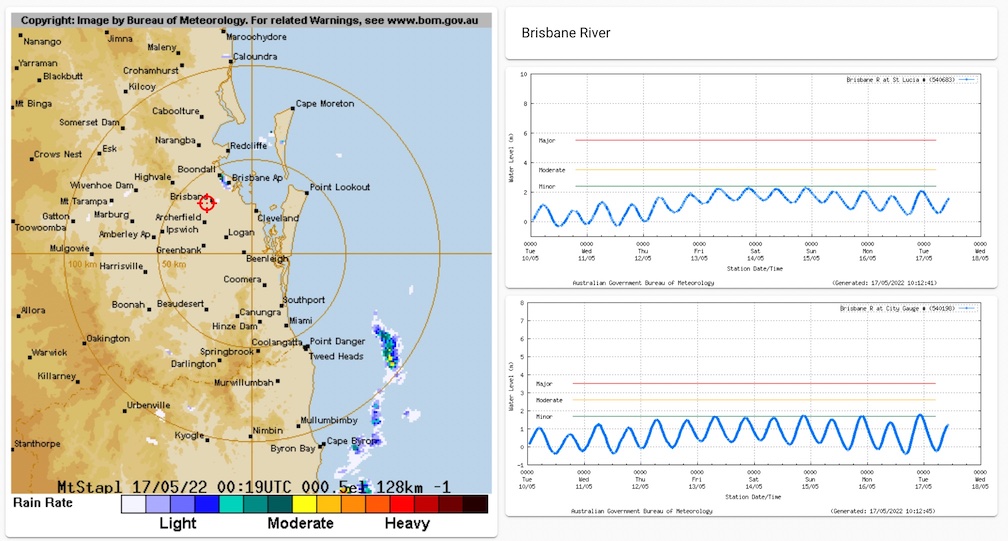
We’ve had some pretty serious weather in Australia so far this year with crazy amounts of rain and several bouts of flooding. One of the places we can go for information about what’s happening is the Australian Bureau of Meteorology website, and if you have a bit of an explore around the webpage, you’ll find lots of useful information and charts. One of the drawbacks though is that you need to navigate around to get to all the charts that are of interest. Wouldn’t it be great to have those charts all in one place?
If you’re a Home Assistant user, you can set this up on a dashboard.
Set up a rain radar image

There used to be an Australian weather card that you could install into HA, but at some stage, the terms changed and the card was removed from availability. For a long time, I replaced this feature with a picture card, but I was always dissatisfied with the fact that my location wasn’t shown on it (On a side note, I’d also like to have it animate the previous 4 images too, but that’s a project for another day!). I recently discovered the Picture Elements Card in HA and wondered if it could serve my purpose.
The Picture Elements Card seems to have been intended for displaying the state of your sensors on a house plan overlay. I can see how this could be super-awesome in the right set up. You can actually overlay several different types of elements over your background image. Probably the most common would be the state icon, which could be used to show a light bulb for instance, and light it the colour of the bulb when it is on. You can even place a button on the image, effectively creating a graphical interface to your HA environment. In our case though, we simply want to show a location, so we’ll use the Icon element. To set up the card, go into the edit mode in the Home Assistant dashboard. Add a card and select the Picture Elements card. There is a few cards related to pictures, and each has a different function - make sure you select the Picture Elements one as shown below:

There is no visual editor for this one, so we’ll need to work in the code space. By default, it is configured with a state-badge element, so we need to change a few things. The overall type can remain the same, and we will change the details of the elements later. Let’s start with the image though. For the image, we need to go to the BOM website and find the URL of the radar image we’d like to show. Go to the Bureau of Meteorology website and find the radar loop that you’d like to display. We need to use the latest image though, so click the Single Image tab along the top. right click on the image and copy the image’s address. It should look something like this:
http://www.bom.gov.au/radar/IDR663.gif?20220513044030
The URL we need for the picture card in Home Assistant doesn’t need the timestamp at the end, so we strip that bit and the URL becomes:
http://www.bom.gov.au/radar/IDR663.gif
Paste this URL into the base configuration as the image: field. Now that we have our background image configured, it’s time to set up the overlay element. I’ve chose the icon type as it allows us to quickly add an icon from the Material Design library. To implement the icon element, change the type within the elements section to icon. We can leave the style configuration consistent for now, but we need to add a line to define the icon we wish to use. In my case, I have chosen a target icon - mdi:target. I’ve also added a colour to the style settings so that I can clearly see the icon over the top of the image. So the configuration should now look something like this:
type: picture-elements
elements:
  - type: icon
    icon: mdi:target
    style:
      top: 37%
      left: 41%
      color: red
image: http://www.bom.gov.au/radar/IDR663.gif

At this point, you can edit the percentages for the position so that the icon is appropriately placed for your location. There’s no reason you couldn’t add more icons and other elements to this card to show your friends or family locations for instance. Just add another -type: ... entry together with it’s associated configurations.
Set up river heights panels

A similar process can be taken to add river height charts to your dashboard. I wanted to show a couple of locations so that I could see what’s coming from upstream, so I actually placed the images within a Vertical Stack card. It groups the 2 images together and gives me an option to put in a title too.
For the River height charts, just use the Picture card as shown below.

To get the URL for the river heights charts, you need to find the page for the specific measuring station you’re after. If you don’t already have the charts, a good starting point is the top level Rainfall and River Conditions page. Once you go into your state, you will also find a menu option on the right titled Rain & River Data - this is where you’ll eventually find the charts I’m using. Again, once you get to the chart you want to display, right click on the image and copy the image address. In this case, we don’t need to strip any information from the url and can use the copied information directly. Simply add this as the image path in your Picture Card configuration to show it in Home Assistant. While you still have the webpage open, you could set up HA to navigate to the actual website if the user clicks on the chart - handy if you want to make sure it’s up to date, or if you want to navigate to the underlying data for instance. If this is the case, set the Tap Action to URL and enter the webpage URL into the URL Path field. Mine looks like this:

Alternatively, the code looks like this:
type: vertical-stack
cards:
  - type: markdown
    content: Brisbane River
  - type: picture
    image: http://www.bom.gov.au/fwo/IDQ65389/IDQ65389.540683.png
    tap_action:
      action: url
      url_path: http://www.bom.gov.au/fwo/IDQ65389/IDQ65389.540683.plt.shtml
    hold_action:
      action: none
  - type: picture
    image: http://www.bom.gov.au/fwo/IDQ65389/IDQ65389.540198.png
    tap_action:
      action: url
      url_path: http://www.bom.gov.au/fwo/IDQ65389/IDQ65389.540198.plt.shtml
    hold_action:
      action: none
HTTPS workaround
This process may not work on a hosted instance of Home Assistant. If you have SSL configured, your browser may not allow you to embed non-ssl images, and at this point, the Australian Government’s Bureau of Meteorology website doesn’t implement SSL. This is evident by the fact that all the image addresses we’ve used are prefixed by http:// not https://. You can get around this by using an image caching service such as images.weserv.nl. To use this site, change the image addresses such that a URL like this:
http://www.bom.gov.au/fwo/IDQ65388/IDQ65388.540596.png
becomes
https://images.weserv.nl/?url=http://www.bom.gov.au/fwo/IDQ65388/IDQ65388.540596.png&maxage=0d
ie: https://images.weserv.nl/?url= original-image-address &maxage=0d
Note that we need the &maxage=0d suffix to prevent the image being served from a cached image (obviously we want the most up to date image, not one from yesterday!).
I hope this helps someone out there to have a quick way to see what is going on with the weather around them or someone they care about. With more information at our fingertips, we can be better prepared for things that life throws at us. Most of all though, I wish everyone that has been effected by flooding all the best.


